Spring in Acton 4读书笔记之AOP的语法

在之前的读书笔记Spring in Acton 4读书笔记之AOP原理及Spring对AOP的支持中,讲解了AOP的各个组成部分,其中pointcut和advice组成了aspect,是AOP的基础。本文对应Spring in Action(Spring 实战)第四版的第四章第二节(4.2 Selecting join points with pointcuts)的内容,将讲解aspect特别是pointcut的语法。

Spring中的表达式主要使用AspectJ的表达式,另外,添加了一个自己的bean()函数。

AspectJ的语法

Spring的AOP中,pointcut使用AspectJ的一部分pointcut语法表达式,可使用的表达式如下:

  • args(),匹配的函数,其参数的类型必须是args()指定的类型
  • @args(),匹配的函数,其参数必须被@args指定的标签标注
  • execution(),匹配指定的函数
  • this(),匹配的函数,它的AOP代理实例必须是指定的类型
  • target(),匹配的函数,所在类必须是指定的类型
  • @target(),匹配的函数,所在类必须由指定类型的标签标注
  • within(),匹配的函数,所在类必须是指定的类型之一
  • @within(),匹配的函数,所在类必须由指定类型之一的标签标注(使用Spring AOP时,定义的方法必须在由指定类型之一的标签标注的类中)
  • @annotation,匹配的函数,其自身必须由指定的标签标注。

如果尝试使用AspectJ的其它语法,Spring会抛出IllegalArgumentException异常。

上面的这些表达式中,实际上,只有execution是真正实行匹配的,其它的是进行进一步限制。

下面举例说明execution的使用。

execution语法

可以看到,这里指定了方法为concert.Performance.perform,既指定了类,也指定了方法。这个例子中,“..”表示参数没有进行限制,”*”表示返回类型也没有进行限制。

1
2
execution(* concert.Performance.perform(..))
&& within(concert.*)

execution和within方法使用&&进行关联,表示”与“,即两个条件都要满足,此外,可以使用||表示或,!表示非。也可以使用”and”,”or”和”not”。注:书中的例子有笔误,最后面多了一个多余的括号,我这里把它去掉了。

Spring添加的bean函数

Spring添加了bean()函数,声明join point必须是指定id的bean,例子如下:

1
2
execution(* concert.Performance.perform())
and bean('woodstock')

表示只能作用在id为woodstock的bean的perform方法上。而下面的这个例子表示作用在id不是woodstock的bean的perform方法上。

1
2
execution(* concert.Performance.perform())
and !bean('woodstock')

Spring in Acton 4读书笔记之AOP原理及Spring对AOP的支持

Spring in Action(Spring 实战)的第四章第一节(4.1 What is aspect-oriented programming)讲述了AOP原理及Spring对AOP的支持。有关AOP的主要思想和优点,可以参看这篇笔记《Spring in Action》第四版第一章《将 Spring 付诸实践》读书笔记(一)。本文将讲解AOP的各个组成部分、使用方式,以及Spring对AOP的支持。

最近在看美剧《西部世界》,我就结合书中的例子用西部世界的机器人来举例吧。

AOP各个部分的概念和作用(Defining AOP terminology)

aop各个部分的概念

如图所示,在程序执行过程中,在其中执行某些特定任务的过程前后,需要执行一些操作。join point代表要执行额外动作的场景,advice则定义哪个时间点(任务执行前还是执行后)要做哪些额外操作,但advice还不知道要关注哪些场景。pointcut告诉每一个advice要执行操作的场景。这样就完整地定义了在哪些场景下、场景执行的哪个时间点下执行哪些动作了。这样听起来有些抽象。举个例子吧。

美剧《西部世界》里的游乐场,给很多机器人编写了脚本,让它们按照具体进行行动。假设其中一个观众机器人去剧场看一场表演。好了,观众到了剧场,在表演开始前,她要关闭手机。并且在表演开始前,她要坐下。在表演结束后,她要鼓掌。如果在表演过程中,表演由于设备故障无法继续,她要喊退票(^_^)。如果我们只把advice告诉这位机器人,那么她的知识是,她知道自己有四种任务,在某些事情开始前,她要做关闭手机和坐下两件事,在某些事情开始前,她要在坐下。某些事情结束后,她要鼓掌,如果在某些事情进行过程中,出了异常,她要喊退票。她不知道是某些事情到底是哪些事情。这时候,再告诉她,这些事情都是指一场表演。那她就知道该在什么时候做什么了。advice和pointcut合起来就是aspect,构成了所有需要知道的信息。

接下来解释weaving这个术语,weaving是将aspect应用到一个具体的对象的join point上。这个动作由spring等框架在目标对象的以下生命周期完成:

  • 编译时应用。在编译目标类的时候应用aspect,这需要一个特殊的编译器,AspectJ的weaving编译器就是通过这种方式应用aspect的。
  • 加载类的时候,在将目标类加载到JVM的时候应用aspect,这需要一个特殊的ClassLoader,用来在目标类被引入应用程序之前,先访问目标类的二进制代码。AspectJ 5的load-time weaving(LTW)支持通过这种方式应用aspect。
  • 运行时应用。 在应用程序执行的某个时候应用aspect,特别地,AOP的容器动态生成目标对象的代理对象,以应用aspect。这也是Spring的方式。

Spring对AOP的支持

不同框架对AOP有不同程度的支持。Spring对AOP的支持包含四方面:

  1. Spring基于代理的经典的AOP
  2. 使用XML配置将纯POJO转化为aspect
  3. 使用Spring的@Aspect标签,创建aspect
  4. Spring不创建aspect,只注入(引用)AspectJ框架的aspect

前面三种都是Spring自己的AOP实现,特点是基于动态代理,而且只能作用在方法级别。

其中第一种,Spring基于代理的经典的AOP已经过时了,这里不再描述。

第二种方式,是使用Spring的aop包,将纯POJO转化成aspect,再应用到目标类上。这种方式需要使用XML配置,但能够很容易地将POJO转化为aspect。

第三种方式,Spring借用AspectJ的aspect来实现标签驱动的AOP.底层使用的仍然是Spring基于代理的AOP,但是编程模型更像AspectJ。这种方式的好处是不用使用XML配置。

第四种方式,Spring并不负责创建aspect的bean,而是由AspectJ创建bean,Spring注入(引用)bean。

Spring的AOP框架的要点

Spring的advice是用Java写的

其中,pointcuts除了用java的标签之外,也可以用xml配置,但java开发人员对此都很熟悉。与Spring不同的是,AspectJ框架使用的不是纯粹的java,这样,虽然功能更强大,但也增加了学习成本。

Spring在运行时应用aspect

代理类接管方法调用,执行额外的逻辑,然后再调用目标方法

Spring在运行时,通过代理类,将aspect应用到Spring管理的bean中。当调用一个类的方法时,代理类解析该方法调用,再执行面向方面的逻辑代码,最后,执行被调用的原始类的方法。也就是说,代理在执行目标类的方法之前,执行了额外的面向方面的业务逻辑。

只有当应用程序需要时,Spring才会生成代理类的实例。如果使用ApplicationContext,只有在从BeanFactory加载完了所有的bean之后,才会创建代理用的bean。

由于Spring在运行时创建代理,所以不需要使用特殊的编译器,将aspect应用到join point中。

Spring只支持方法级别的join point

Spring不支持将aspect应用到field级别,所以不能用来更新字段。Spring不支持构造函数,所以在bean初始化的时候,无法使用AOP。大部分情况下,Spring对AOP的支持是够用的,如果不够用,可以使用上面说第四种方式,增强功能。

Spring in Acton 4读书笔记之在运行时注入值

Spring in Action(Spring实战)第三章第五节(3.5 Runtime value injection)讲述运行时注入值,第三章讲述装配bean的一些高级专题,之前的章节一直在讨论用Spring注入bean,实际上,有时候也需要给一些变量注入值。

比如下面的例子其实就是通过构造函数给BlankDisc的title属性注入值,这里用的是硬编码的方式:

1
2
3
4
5
6
7
8
9
10
11
12
13
14
15
16
17
18
19
20
//代码清单一,BlankDisc类
public class BlankDisc {

private final String title;
private final String artist;

public BlankDisc(String title, String artist) {
this.title = title;
this.artist = artist;
}

public String getTitle() {
return title;
}

public String getArtist() {
return artist;
}

}
1
2
3
4
5
6
7
//代码清单二,使用hardcode注入title和artist
@Bean
public CompactDisc sgtPeppers() {
return new BlankDisc(
"Sgt. Pepper's Lonely Hearts Club Band",
"The Beatles");
}

硬编码常常会引起问题,Spring提供了以下两种方式,在运行时给变量注入值:

  • 属性占位符(Property placeholders)
  • Spring正则表达式(Spring Expression Language)

从外部注入值

将属性从外部注入到Environment,然后显式地从Environment获取属性值或者使用属性占位符隐式地从Environment获取属性值。

从Environment获取属性值

最简单的方式是定义属性,然后通过Spring的Environment变量获取这些属性。下面的例子演示了如何使用配置文件,从外部注入值,并且装配bean。

1
2
3
4
5
6
7
8
9
10
11
12
13
14
15
16
//代码清单三,从外部注入title和artist
@Configuration
@PropertySource("classpath:/com/soundsystem/app.properties")
public class EnvironmentConfig {

@Autowired
Environment env;

@Bean
public BlankDisc blankDisc() {
return new BlankDisc(
env.getProperty("disc.title"),
env.getProperty("disc.artist"));
}

}

与代码清单二使用硬编码不同,代码清单三,从Environment中获取disc.title和disc.artist属性值,在运行时动态地将值注入给BlankDisc的title和artist属性。其中@PropertySource标签指定属性文件的路径。

Environment接口详解

1
2
3
4
5
6
7
8
public interface Environment extends PropertyResolver {

String[] getActiveProfiles();

String[] getDefaultProfiles();

boolean acceptsProfiles(String... profiles);
}

Environment继承自PropertyResolver,并另外添加了几个和Profiles相关的方法,Profiles是用来标记运行环境是开发环境还是生产环境的,更多内容请看我前几天写的这篇读书笔记(Spring in Acton 4 读书笔记之根据开发环境装配 bean)[http://tantanit.com/springinacton4-du-shu-bi-ji-zhi-gen-ju-kai-fa-huan-jing-zhuang-pei-bean/]

PropertyResolver顾名思义,是用来解析属性的,所以大部分方法名都包含Property字样。

1
2
3
4
5
6
7
8
9
10
11
12
13
14
15
16
17
18
19
20
21
22
23
public interface PropertyResolver {

boolean containsProperty(String key);

String getProperty(String key);

String getProperty(String key, String defaultValue);

<T> T getProperty(String key, Class<T> targetType);

<T> T getProperty(String key, Class<T> targetType, T defaultValue);

<T> Class<T> getPropertyAsClass(String key, Class<T> targetType);

String getRequiredProperty(String key) throws IllegalStateException;

<T> T getRequiredProperty(String key, Class<T> targetType) throws IllegalStateException;

String resolvePlaceholders(String text);

String resolveRequiredPlaceholders(String text) throws IllegalArgumentException;

}

因为Environment继承自PropertyResolver,所以也包含这些方法。一共有七个名称是或类似getProperty的方法,最前面两个

1
2
3
String getProperty(String key);

String getProperty(String key, String defaultValue);

是将字符串原样返回的,带defaultValue的方法指明没有key时,返回defaultValue;

而下面三个:

1
2
3
4
5
6
<T> T getProperty(String key, Class<T> targetType);

<T> T getProperty(String key, Class<T> targetType, T defaultValue);

<T> Class<T> getPropertyAsClass(String key, Class<T> targetType);

是将字符串解析为指定类型的,其中getPropertyAsClass返回Class类型。

上面这五个方法中,不带defaultValue的两个,当找不到该属性时,返回null。

而剩下的两个方法,方法名包含required字样,在找不到属性时,将抛出IllegalStateException异常:

1
2
3
String getRequiredProperty(String key) throws IllegalStateException;

<T> T getRequiredProperty(String key, Class<T> targetType) throws IllegalStateException;

此外,containsProperty一目了然,是判断是否包含某属性的。最后,剩下两个用来解析占位符的方法:

1
2
3
String resolvePlaceholders(String text);

String resolveRequiredPlaceholders(String text) throws IllegalArgumentException;

使用属性占位符注入属性值

属性占位符的语法形如${disc.title},比如下面的例子,将使用@Value标签,将disc.title和disc.artist属性分别注入到title和artist。这种方式,实际上也是从Environment获取的,但比从Environment直接获取值更加方便,所以是最经常使用的。

1
2
3
4
5
6
public BlankDisc(
@Value("${disc.title}") String title,
@Value("${disc.artist}") String artist) {
this.title = title;
this.artist = artist;
}

要使用属性占位符,需要在java配置文件中,加载PropertySourcesPlaceholderConfigurer类型的bean:

1
2
3
4
@Bean
public static PropertySourcesPlaceholderConfigurer placeholderConfigurer() {
return new PropertySourcesPlaceholderConfigurer();
}

使用Spring正则表达式注入属性值

Spring正则表达式可以做到:

  • 通过id引入bean
  • 访问对象的属性或执行方法
  • 对值进行数学、关系或逻辑操作
  • 正则表达式匹配
  • 操作列表和集合

语法是形如:#{1}。比如#{1}表示数值1,#{T(System).currentTimeMillis()}获取当前时间,#{sgtPeppers.artist}表示sgtPeppers对象的artist属性等。其实,Spring正则表达式的用法和freemarker的模板语言很像。我(笔者)个人觉得,在后端没有必要使用这么复杂的表达式。对于对象级别的数据,从数据库获取好过用表达式注入。而对于函数操作,使用java类库,可读性也比表达式好很多。

实际上,与spring正则表达式相比,最常用的还是上面所说的,用@Value标签指定属性占位符,注入属性值的方式。

这一章的其它笔记参看

Spring in Action 4读书笔记之如何定义bean的使用范围

Spring in Action(Spring实战)的第三章第四节(3.4 Scoping beans)讲述了bean的使用范围。在不同场景下,可以使用不同的使用范围,比如web程序一般使用和普通应用程序不同的范围。

bean的使用范围

默认情况下,Spring应用上下文中的bean都是单例。这意味着无论一个bean被注入多少次,总是注入同一个实例。

有时候,要处理互斥的任务,要求bean的属性值只被其中一个任务访问和修改,这时候,单例会引起问题。别担心,除了单例外,Spring还定义了bean的其它使用范围。Spring定义的bean使用范围如下:

  • Singleton:单例,整个应用程序使用唯一实例。
  • Prototype:每次注入时都会从Spring应用上下文中创建一个新的实例。
  • Session:在web应用中,为每个session创建一个实例。
  • Request:在web应用中,为每个request创建一个实例。

可以使用@Scope标签标注@Component标签(定义准备被自动注入的bean),也可以使用@Scope标签标注@Bean标签(显式定义bean)。

在xml中,也可以使用bean标签的scope属性指定bean的范围。

使用自动注入的例子:

1
2
3
@Component
@Scope(ConfigurableBeanFactory.SCOPE_PROTOTYPE)
public class Notepad { ... }

使用java显式定义bean的例子:

1
2
3
4
5
@Bean
@Scope(ConfigurableBeanFactory.SCOPE_PROTOTYPE)
public Notepad notepad() {
return new Notepad();
}

使用xml中bean标签的scope属性显示定义bean的例子:

1
2
3
<bean id="notepad"
class="com.myapp.Notepad"
scope="prototype" />

上面的这些例子,都会在每次注入时从Spring应用上下文中创建一个新的实例。

使用request或session范围

在web应用中,在request或session范围内共享一个bean会非常有用。比如在电子商务应用中的购物车,如果定义为Singleton,所有的用户就会使用同一个购物车,显然会造成混乱。如果定义为Prototype,那么每次注入的都是一个新的购物车,那么这个购物车就没法保存东西了。应该定义session范围的bean:

1
2
3
4
5
@Component
@Scope(
value=WebApplicationContext.SCOPE_SESSION,
proxyMode=ScopedProxyMode.INTERFACES)
public ShoppingCart cart() { ... }

value属性定义了这个bean的使用范围是session。另一个proxyMode是为了解决使用session或request范围的bean造成的问题。来看看没有定义这个属性会有什么问题,先看下面注入这个bean的例子:

1
2
3
4
5
6
7
@Component
public class StoreService {
@Autowired
public void setShoppingCart(ShoppingCart shoppingCart) {
this.shoppingCart = shoppingCart;
}
}

StoreService本身是一个单例的bean(没有使用@Scope,使用默认范围),而shoppingCart是一个session范围的bean。这样会带来两个问题。首先,单例的bean在Spring应用上下文加载时就会创建,而这个时候session范围的bean还没有创建,session范围的bean要等到该用户到来,生成了相应session时,才会创建。第二个问题是,单例的bean只有一个实例,而session范围的bean取决于session的个数,一般有多个实例,这样,没有办法知道要为StoreService注入哪个shoppingCart实例。

Spring对scope范围的bean进行代理

所以,需要使用代理模式,如图,为shoppingCart创建一个代理,这个代理定义了ShoppingCart的所有方法,在注入bean时,不是直接注入shoppingCart实例,而是注入这个代理。由于ShoppingCart是一个接口,所以这里使用ScopedProxyMode.INTERFACES。如果是具体实例,则改用ScopedProxyMode.TARGET_CLASS。

request范围的bean的用法和session范围的bean类似,这里不再赘述。

Spring in Action 4读书笔记之解决自动装配bean的二义性问题

Spring in Action(Spring实战)的第三章第三节(3.3 Addressing ambiguity in autowiring)讲述了如何解决自动装配bean的二义性问题。

Spring的自动注入机制极大地减少装配bean的工作量,但在默认情况下,这个机制仅在只有一个bean满足条件时才工作。当有多个bean满足条件时,这种二义性使Spring无法确定使用哪一个bean,也就无法完成自动装配,并且会抛出NoUniqueBeanDefinitionException异常。

比如下面的代码就存在二义性:

1
2
3
4
5
6
7
8
9
10
11
12
13
14
15
@Autowired
public void setDessert(Dessert dessert) {
this.dessert = dessert;
}

@Component
public class Cake implements Dessert { ... }

@Component
public class Cookies implements Dessert { ... }

@Component
public class IceCream implements Dessert { ... }


因为Cake,Cookies,IceCream都实现了Dessert接口,Dessert声明的bean存在二义性,所以setDessert方法在自动注入Dessert类型的组件时,不知道应该注入哪种具体类型的component,将会抛出NoUniqueBeanDefinitionException异常:

1
2
3
4
nested exception is
org.springframework.beans.factory.NoUniqueBeanDefinitionException:
No qualifying bean of type [com.desserteater.Dessert] is defined:
expected single matching bean but found 3: cake,cookies,iceCream

当然,上面的例子只是为了解释什么时候会产生二义性,在实际项目中,很少会遇到这种情况。如果在某些特殊场景遇到了,也可以使用Spring提供的方案很好的解决,具体方案如下:

使用@Primary标签指定首选bean

Spring可以对bean进行自动扫描,也可以显式定义要装配的bean,这两种情况下都可以使用@Primary标签进行标注。

自动扫描:

1
2
3
@Component
@Primary
public class IceCream implements Dessert { ... }

使用java显式定义要装配的bean:

1
2
3
4
5
@Bean
@Primary
public Dessert iceCream() {
return new IceCream();
}

使用XML显示定义bean:

1
2
3
<bean id="iceCream"
class="com.desserteater.IceCream"
primary="true" />

当有多个bean都加了@Primary标签时,这种方法其实并没有解决二义性问题,因为spring仍然会把所有加了这个@Primary标签的bean作为候选bean,所以,更好的方式是使用@Qualifier标签来给每个bean定义id。

使用@Qualifier标签装配指定id的bean

实际上@Qualifier标签有两种用法。一种是在注入bean时,和@Autowired或者@Inject合用,指定要装配哪个id的bean,比如:

1
2
3
4
5
6
//代码清单一
@Autowired
@Qualifier("iceCream")
public void setDessert(Dessert dessert) {
this.dessert = dessert;
}

表示要注入id为iceCream的bean。

另一种用法是,在要被装配的bean上,使用@Qualifier,可以为这个bean定义id(以替代根据类名自动生成的id)。比如:

1
2
3
4
//代码清单二
@Component
@Qualifier("cold")
public class IceCream implements Dessert { ... }

定义IceCream类型的bean的id为cold,作者建议使用cold这样描述性的词汇替代类名自动声明的id,防止bean的类名进行重命名造成注入bean的地方也要跟着改。比如代码清单二中IceCream重命名为Gelato时,代码清单一中使用@Qualifier(“iceCream”)就找不到id为iceCream,就会注入失败了。当然,在不存在二义性的情况下,不需要使用@Qualifier标签来注入bean,也不用特意为类指定id。

因为使用描述性的词汇定义bean,所以很可能遇到重名的情况,比如:

1
2
3
4
//代码清单三
@Component
@Qualifier("cold")
public class Popsicle implements Dessert { ... }

这样Popsicle和IceCream的beanId都是cold,又生成二义性了,此时可以通过使用多个@Qualifier的方式进行定义。

1
2
3
4
5
6
7
8
9
10
11
12
13
14
15
16
17
18
//代码清单四
@Component
@Qualifier("cold")
@Qualifier("creamy")
public class IceCream implements Dessert { ... }


@Component
@Qualifier("cold")
@Qualifier("fruity")
public class Popsicle implements Dessert { ... }

@Autowired
@Qualifier("cold")
@Qualifier("creamy")
public void setDessert(Dessert dessert) {
this.dessert = dessert;
}

由于Spring的@Qualifier标签没有用@Repeatable标注,因此不具备@Repeatable的属性,所以像上面这样重复使用@Qualifier是无效的,清单四的代码要改为:

1
2
3
4
5
6
7
8
9
10
11
12
13
14
15
16
17
18
19
20
21
22
23
24
25
26
27
28
29
30
@Target({ElementType.CONSTRUCTOR, ElementType.FIELD,
ElementType.METHOD, ElementType.TYPE})
@Retention(RetentionPolicy.RUNTIME)
@Qualifier
public @interface Cold { }


@Target({ElementType.CONSTRUCTOR, ElementType.FIELD,
ElementType.METHOD, ElementType.TYPE})
@Retention(RetentionPolicy.RUNTIME)
@Qualifier
public @interface Creamy { }

@Component
@Cold
@Creamy
public class IceCream implements Dessert { ... }

@Component
@Cold
@Fruity
public class Popsicle implements Dessert { ... }

@Autowired
@Cold
@Creamy
public void setDessert(Dessert dessert) {
this.dessert = dessert;
}

新增了@Cold,@Creamy等标签替代@Qualifier。类比于html,这样用法是把id当作class使用,好处是更加灵活,但代码看起来也更复杂了一些。其实,一般情况下,使用一个@Qualifier标签就够了,用不到这种多重定义。

Spring in Action读书笔记之根据条件创建bean

有时候希望只在某些情况下才创建bean,Spring4引入的@Conditional标签可以做到这一点。

Spring in Action(Spring实战)的第三章第二节(3.2 Conditional beans)讲述了如何根据条件创建bean,以下是我阅读这一节的读书笔记。

以下使用显示创建bean的方法,举例说明如何根据条件创建bean(创建bean的方法)。

1
2
3
4
5
6
7
8
9
10
11
@Configuration
@PropertySource("classpath:site.properties")
public class MagicConfig {

@Bean
@Conditional(MagicExistsCondition.class)
public MagicBean magicBean() {
return new MagicBean();
}

}

magicBean()加了@Conditional标签,并且指定MagicExistsCondition定义判断逻辑。

1
2
3
4
5
6
7
8
9
public class MagicExistsCondition implements Condition {

@Override
public boolean matches(ConditionContext context, AnnotatedTypeMetadata metadata) {
Environment env = context.getEnvironment();
return env.containsProperty("magic");
}

}

MagicExistsCondition的matches方法,决定是否加载bean。当返回值为true时加载,否则不加载。这段代码表示,判断环境中是否定义了magic属性。我在MagicConfig方法上加了@PropertySource标签,用来指定配置文件为classpath下的site.properties,并且在文件中写入以下属性(这个例子中只需要有key,不需要有值):

1
magic=

这样,MagicExistsCondition的matches方法就会返回true,从而容器会创建magicBean()对应的bean了。以下测试程序用来验证context中是否包含magicBean。验证通过。

1
2
3
4
5
6
7
8
9
10
11
12
13
14
15
16
17
18
@RunWith(SpringJUnit4ClassRunner.class)
@ContextConfiguration(classes=MagicConfig.class)
public class MagicExistsTest {

@Autowired
private ApplicationContext context;

/*
* This test will fail until you set a "magic" property.
* You can set this property as an environment variable, a JVM system property, by adding a @BeforeClass
* method and calling System.setProperty() or one of several other options.
*/
@Test
public void shouldNotBeNull() {
assertTrue(context.containsBean("magicBean"));
}

}

还记得上一节讨论的根据开发环境装配bean吗,配置文件中的@Profile标签本身是被@Conditional标注,并且指定ProfileCondition进行判断的,这是Spring实现的@Conditional标签的特例,而本节可以看到,我们可以根据需要
自己决定在什么情况下加载bean。

Profile如下:

1
2
3
4
5
6
7
8
9
10
11
12
@Retention(RetentionPolicy.RUNTIME)
@Target({ElementType.TYPE, ElementType.METHOD})
@Documented
@Conditional(ProfileCondition.class)
public @interface Profile {

/**
* The set of profiles for which the annotated component should be registered.
*/
String[] value();

}

ProfileCondition如下:

1
2
3
4
5
6
7
8
9
10
11
12
13
14
15
16
17
18
19
class ProfileCondition implements Condition {

@Override
public boolean matches(ConditionContext context, AnnotatedTypeMetadata metadata) {
if (context.getEnvironment() != null) {
MultiValueMap<String, Object> attrs = metadata.getAllAnnotationAttributes(Profile.class.getName());
if (attrs != null) {
for (Object value : attrs.get("value")) {
if (context.getEnvironment().acceptsProfiles(((String[]) value))) {
return true;
}
}
return false;
}
}
return true;
}

}

随书提供的官方样例(点击从官方网站下载),没有添加属性文件,也没有在MagicConfig中加载属性,所以测试用例是跑不通的,作者把这部分实现工作留给了读者。所以我在resource目录下(项目的classpath)增加了上文中的site.properties文件,并且将用PropertySource标注,指明从classpath:site.properties加载属性,这样操作之后,测试用例通过了。当然,您也可以用自己的方式加载属性。

Spring in Acton 4读书笔记之根据开发环境装配bean

Spring in Action(Spring实战)的第三章第一节(3.1 Environments and profiles)讲述了根据开发环境装配bean,本文是阅读这一节的心得笔记。

开发中遇到的最大挑战之一,是环境的变化。数据库配置、加密算法以及与外部系统的集成等都和开发环境相关。

编译时定义bean

以数据库为例,在开发的时候,会倾向于使用测试数据,比如在Spring的配置类里,可能会像下面这样配置EmbeddedDatabaseBuilder(),以创建一个DataSource的bean:

1
2
3
4
5
6
7
@Bean(destroyMethod="shutdown")
public DataSource dataSource() {
return new EmbeddedDatabaseBuilder()
.addScript("classpath:schema.sql")
.addScript("classpath:test-data.sql")
.build();
}

这样,在开发环境中,可以根据需要,在schema.sql和test-data.sql中增加模拟数据。生产环境不能这么做,而更倾向于使用JNDI,创建一个DataSource的bean:

1
2
3
4
5
6
7
8
9
@Bean
public DataSource dataSource() {
JndiObjectFactoryBean jndiObjectFactoryBean =
new JndiObjectFactoryBean();
jndiObjectFactoryBean.setJndiName("jdbc/myDS");
jndiObjectFactoryBean.setResourceRef(true);
jndiObjectFactoryBean.setProxyInterface(javax.sql.DataSource.class);
return (DataSource) jndiObjectFactoryBean.getObject();
}

使用JNDI,容器可以决定怎样创建DataSource,包括从连接池中交接DataSource。当然,这些对生产环境很有用,但对开发情况下的测试以及简单的集成测试来说,一般并不需要。

而QA环境可能想用另外的配置:

1
2
3
4
5
6
7
8
9
10
11
@Bean(destroyMethod="close")
public DataSource dataSource() {
BasicDataSource dataSource = new BasicDataSource();
dataSource.setUrl("jdbc:h2:tcp://dbserver/~/test");
dataSource.setDriverClassName("org.h2.Driver");
dataSource.setUsername("sa");
dataSource.setPassword("password");
dataSource.setInitialSize(20);
dataSource.setMaxActive(30);
return dataSource;
}

可以使用例如Maven profiles的方式,在不同环境进行重新编译(build)来解决和环境相关的问题,但是,重新build可能引入新的bug,而这是灾难性的。

运行时生成bean

Spring的方案和上述方案差不多,只是改成了运行时配置。生产环境和开发环境使用同一套代码,避免在发布时,因为更改java代码,重新编译代码引起问题。可以在方法或类上加Profile标签,这样,只有环境满足条件时,才会生成相应的bean,而没有加这个标签的bean是在任何条件下都会生成的。

1
2
3
4
5
6
7
8
9
10
11
12
13
14
15
16
17
18
19
20
21
22
23
24
@Configuration
public class DataSourceConfig {

@Bean(destroyMethod = "shutdown")
@Profile("dev")
public DataSource embeddedDataSource() {
return new EmbeddedDatabaseBuilder()
.setType(EmbeddedDatabaseType.H2)
.addScript("classpath:schema.sql")
.addScript("classpath:test-data.sql")
.build();
}

@Bean
@Profile("prod")
public DataSource jndiDataSource() {
JndiObjectFactoryBean jndiObjectFactoryBean = new JndiObjectFactoryBean();
jndiObjectFactoryBean.setJndiName("jdbc/myDS");
jndiObjectFactoryBean.setResourceRef(true);
jndiObjectFactoryBean.setProxyInterface(javax.sql.DataSource.class);
return (DataSource) jndiObjectFactoryBean.getObject();
}

}

也可以使用XML做到这一点,本笔记略。

Profile 标签的定义如下:

1
2
3
4
5
6
7
8
9
10
11
12
@Retention(RetentionPolicy.RUNTIME)
@Target({ElementType.TYPE, ElementType.METHOD})
@Documented
@Conditional(ProfileCondition.class)
public @interface Profile {

/**
* The set of profiles for which the annotated component should be registered.
*/
String[] value();

}

可以看出,Profile标签是运行时生效,并且支持标注在类和方法上,同时,被@Conditional标注,表明只有满足ProfileCondition条件时,才生效。ProfileCondition定义如下:

1
2
3
4
5
6
7
8
9
10
11
12
13
14
15
16
17
18
19
class ProfileCondition implements Condition {

@Override
public boolean matches(ConditionContext context, AnnotatedTypeMetadata metadata) {
if (context.getEnvironment() != null) {
MultiValueMap<String, Object> attrs = metadata.getAllAnnotationAttributes(Profile.class.getName());
if (attrs != null) {
for (Object value : attrs.get("value")) {
if (context.getEnvironment().acceptsProfiles(((String[]) value))) {
return true;
}
}
return false;
}
}
return true;
}

}

可以看出,判断是否匹配的逻辑是,从@Profile标签中获取可接受的Profile值列表(可以有多个值),再从上下文中获取环境,判断环境中当前是否包含这些Profile值,以判断当前环境是否满足条件。那么,如何在环境中设置当前Profile值呢?

在环境中设置当前Profile

Spring使用spring.profiles.active和spring.profiles.default属性来确定当前Profile。spring.profiles.active不为空时,spring.profiles.active的值是当前Profile,spring.profiles.active的值为空时,spring.profiles.default的值是当前Profile,两个都为空时,则所有加了Profile标签的bean都不生成,没有加Profile标签的bean才会生成。可以使用以下方式设置这两个属性:

  • 作为DispatcherServlet的参数
  • 作为web应用上下文的参数
  • 作为JNDI的entry
  • 作为环境变量
  • 作为JVM系统属性
  • 在一个集成测试类上使用@ActiveProfiles标签

你可以自己选择最合适的方式。

测试Profile以指定环境

当代码里使用了Profile来指定环境相关的操作后,有时候需要在测试环境中模拟与生产环境相同的Profile,来进行测试。Spring提供了@ActiveProfiles标签,指定测试程序运行时的当前Profile。下面,在添加开发环境配置初始化sql文件schema.sql和test-data.sql后,以及上文中的DataSourceConfig的配置类后,进行数据库测试(这些代码都可以在官方样例下载)。

schema.sql如下:

1
2
3
4
create table Things (
id identity,
name varchar(100)
);

test-data.sql如下:

1
insert into Things (name) values ('A')

测试代码如下:

1
2
3
4
5
6
7
8
9
10
11
12
13
14
15
16
17
18
19
20
21
22
23
24
25
26
27
28
29
30
31
32
33
34
35
36
37
38
39
40
41

public class DataSourceConfigTest {
@RunWith(SpringJUnit4ClassRunner.class)
@ContextConfiguration(classes=DataSourceConfig.class)
@ActiveProfiles("dev")
public static class DevDataSourceTest {
@Autowired
private DataSource dataSource;

@Test
public void shouldBeEmbeddedDatasource() {
assertNotNull(dataSource);
JdbcTemplate jdbc = new JdbcTemplate(dataSource);
List<String> results = jdbc.query("select id, name from Things", new RowMapper<String>() {
@Override
public String mapRow(ResultSet rs, int rowNum) throws SQLException {
return rs.getLong("id") + ":" + rs.getString("name");
}
});

assertEquals(1, results.size());
assertEquals("1:A", results.get(0));
}
}

@RunWith(SpringJUnit4ClassRunner.class)
@ContextConfiguration(classes=DataSourceConfig.class)
@ActiveProfiles("prod")
public static class ProductionDataSourceTest {
@Autowired
private DataSource dataSource;

@Test
public void shouldBeEmbeddedDatasource() {
//JNDI中没有配置数据库,所以dataSource应该为null
assertNull(dataSource);
}
}

}

可以看到,开发环境的dataSource生成成功,并且能够正确的查询数据。而生产环境由于没有在JNDI中配置数据库,dataSource为空。

《Spring in Acton》第四版第二章《装配bean》读书笔记

Spring in Action(Spring实战)的第二章讲述了如何装配bean。

Spring中装配的主要方式

  • XML显式配置
  • Java显式配置
  • 使用Java隐式扫描bean并自动装配

三种方式各有好处,作者认为选哪种只是口味问题,但强烈建议使用第三种(使用Java隐式扫描bean并自动装配),并且建议即使要用显式配置,也尽量使用Java配置,因为Java更好用(powerful),具有类型安全检查,并且更好重构。只有在XML有命名空间可以很方便使用,而JavaConfig中没有的时候才使用XML显式配置。

使用Java隐式扫描bean并自动装配

Spring的这种方案实在是太好用了,应该尽量利用这种机制。这个方案中,我们要做的事情包括两个方面:让bean可以被扫描以及在使用bean的地方声明注入bean。这样,Spring就可以扫描并生成bean,并且在要使用的地方注入bean了。

让bean可以被扫描到

  1. 在类上加@Component标签,标记这个类可以作为组件供其它类使用。
  2. 写一个Java配置类,加上@Configuration和@ComponentScan标签,(也可以用xml实现,略)

在启动项目时,Spring就会在这个配置类所在的目录下查找有加@Component标签的类,并且自动生成bean了。

在类上加@Component标签:

1
2
3
4
5
6
7
8
9
10
11
12
13
14
15
16
package soundsystem;

import org.springframework.stereotype.Component;

@Component
public class SgtPeppers implements CompactDisc {

private String title = "Sgt. Pepper's Lonely Hearts Club Band";
private String artist = "The Beatles";

public void play() {
System.out.print("Playing " + title + " by " + artist);
}

}

配置类加加上@Configuration和@ComponentScan标签:

1
2
3
4
5
6
7
8
9
10
package soundsystem;
import org.springframework.context.annotation.ComponentScan;
import org.springframework.context.annotation.Configuration;

@Configuration
@ComponentScan
public class CDPlayerConfig {
}


标注被扫描bean的位置

有时候,配置类和要扫描的类不在同一个目录下,此时要标明要扫描的类所在的包或者直接标明要扫描的类。

1
2
3
4
@Configuration
@ComponentScan(basePackages={"soundsystem", "video"})
public class CDPlayerConfig {}

1
2
3
4
5

@Configuration
@ComponentScan(basePackageClasses={CDPlayer.class, DVDPlayer.class})
public class CDPlayerConfig {}

为bean定义id

Spring会默认将类的第一个字母改为小写,作为bean的id,如果一个类有多个bean,或者只是想改用其它id,可以通过以下两种方式,定义bean的id:

1
2
3
4
5
6

@Component("lonelyHeartsClub")
public class SgtPeppers implements CompactDisc {
...
}

1
2
3
4
5
6
package soundsystem;
import javax.inject.Named;
@Named("lonelyHeartsClub")
public class SgtPeppers implements CompactDisc {
...
}

在使用bean的地方声明注入bean

1
2
3
4
5
6
7
8
9
10
11
12
13
14
15
16
17
18
19
package soundsystem;
import org.springframework.beans.factory.annotation.Autowired;
import org.springframework.stereotype.Component;

@Component
public class CDPlayer implements MediaPlayer {
private CompactDisc cd;

@Autowired
public CDPlayer(CompactDisc cd) {
this.cd = cd;
}

public void play() {
cd.play();
}

}

要使用bean的地方(类成员变量,构造函数或普通方法都可以),加 @Autowired或 @Inject标签,注入bean,就可以开始使用了。从Autowired或和Inject的名称可以看出,其实wire(装配)和inject(注入)的意思差不多,都是表示将bean连接起来。其实wire的意思就是连接。

因为只有SgtPeppers实现了CompactDisc,所以上面的例子会自动注入一个SgtPeppers实例,有时,有多个bean都实现了CompactDisc接口,那么在注入时,需要声明注入的bean的id。代码如下:

1
2
3
4
5
6
7
8
9
10
11
12
13
14
15
@Component
public class CDPlayer implements MediaPlayer {
private CompactDisc cd;

@Autowired
@Qualifier("lonelyHeartsClub")
public CDPlayer(CompactDisc cd) {
this.cd = cd;
}

public void play() {
cd.play();
}

}

验证自动化注入

1
2
3
4
5
6
7
8
9
10
11
12
13
14
15
16
17
18
19
20
21
22
23
24
25
26
27
28
29

@RunWith(SpringJUnit4ClassRunner.class)
@ContextConfiguration(classes = CDPlayerConfig.class)
public class CDPlayerTest {

@Rule
public final StandardOutputStreamLog log = new StandardOutputStreamLog();

@Autowired
private MediaPlayer player;

@Autowired
private CompactDisc cd;

@Test
public void cdShouldNotBeNull() {
assertNotNull(cd);
}

@Test
public void play() {
player.play();
assertEquals(
"Playing Sgt. Pepper's Lonely Hearts Club Band by The Beatles",
log.getLog());
}

}

为了避免不同操作系统换行符的不同,我将原代码中的换行符去掉了,相应的,将SgtPeppers的play方法的println也改成print了。

在Java配置文件中显式注册bean

定义配置文件

1
2
3
4
5
6
7
8
9
10
11

@Configuration
public class CDPlayerConfig {

@Bean
public CompactDisc sgtPeppers() {
return new SgtPeppers();
}

}

CDPlayerConfig加上Configuration标签,标注为配置文件,但是去掉了ComponentScan标签,所以要显式定义bean。

使用Bean标签

Bean标签表示该方法返回的bean会被注册到Spring容器里,并且id和方法名称一样,也可以使用name参数定义id。

1
2
3
4
@Bean(name="lonelyHeartsClubBand")
public CompactDisc sgtPeppers() {
return new SgtPeppers();
}

下面的例子通过构造函数将CompactDisc注入CDPlayer:

1
2
3
4
5
6
7
8
9
10
11
12
13
14
15
16
17
18
19
@Configuration
public class CDPlayerConfig {

@Bean
public CompactDisc sgtPeppers() {
return new SgtPeppers();
}

@Bean
public CDPlayer cdPlayer() {
return new CDPlayer(sgtPeppers());
}

@Bean
public CDPlayer anotherCDPlayer() {
return new CDPlayer(sgtPeppers());
}

}

Config文件中,两个方法内调用相同的Bean方法,是否会生成两个sgtPeppers实例?如果没有使用Spring的话,是会有两个实例,使用Spring机制之后,CDPlayer并不是在调用sgtPeppers(),而是从Spring容器中获取bean,所以只有一个bean。这个调用过程有些让人困惑,所以,更好的方式是直接引用bean:

1
2
3
4
5
6
7
8
9
10
11
12
13
14
15
16
17
18
19
@Configuration
public class CDPlayerConfig {

@Bean
public CompactDisc compactDisc() {
return new SgtPeppers();
}

@Bean
public CDPlayer cdPlayer(CompactDisc compactDisc) {
return new CDPlayer(compactDisc);
}

@Bean
public CDPlayer anotherCdPlayer(CompactDisc compactDisc) {
return new CDPlayer(compactDisc);
}

}

在这里,cdPlayer和anotherCdPlayer这两个方法,因为在Java配置文件中,并且加了@Bean标签,都会尝试自动注入CompactDisc类型的bean。Spring会通过扫描目录,查找Java配置文件中带Bean标签的方法,甚至查找XML配置文件来找到需要的bean。在这里例子中,是通过在带有Configuration的Java配置文件CDPlayerConfig(这里正好是同一个文件)中查找带有Bean标签的compactDisc()方法,找到对应的bean的,这个bean是一个SgtPeppers实例。

验证使用Java配置文件显示注册bean

1
2
3
4
5
6
7
8
9
10
11
12
public class SgtPeppers implements CompactDisc {

private String title = "Sgt. Pepper's Lonely Hearts Club Band";
private String artist = "The Beatles";
private int times = 0;

public void play() {
times++;
System.out.print("Playing " + title + " by " + artist + "," + times);
}

}

以下是测试代码:

1
2
3
4
5
6
7
8
9
10
11
12
13
14
15
16
17
18
19
20
21
22
23
24
25
26
27
28
29
30
31
32
33
34
35
36
37
38
39
40
41
42
43
44
package soundsystem;

import static org.junit.Assert.*;

import org.junit.Rule;
import org.junit.Test;
import org.junit.contrib.java.lang.system.StandardOutputStreamLog;
import org.junit.runner.RunWith;
import org.springframework.beans.factory.annotation.Autowired;
import org.springframework.beans.factory.annotation.Qualifier;
import org.springframework.test.context.ContextConfiguration;
import org.springframework.test.context.junit4.SpringJUnit4ClassRunner;

@RunWith(SpringJUnit4ClassRunner.class)
@ContextConfiguration(classes = CDPlayerConfig.class)
public class CDPlayerTest {

@Rule
public final StandardOutputStreamLog log = new StandardOutputStreamLog();


@Autowired
@Qualifier("cdPlayer")
private MediaPlayer player;

@Autowired
@Qualifier("anotherCdPlayer")
private MediaPlayer anotherPlayer;

@Test
public void play() {
player.play();
assertEquals(
"Playing Sgt. Pepper's Lonely Hearts Club Band by The Beatles,1",
log.getLog());
log.clear();
anotherPlayer.play();
assertEquals(
"Playing Sgt. Pepper's Lonely Hearts Club Band by The Beatles,2",
log.getLog());
}

}

笔者注:我在SgtPeppers类中加了个成员变量times,这个变量不是static的,而是对象级别的,所以通过验证times是否递增,可以验证两个player是否使用的是同一个bean。测试通过,说明使用的确实是同一个bean。另外,为了避免不同操作系统换行符的不同,我将原代码中的换行符去掉了,相应的,将SgtPeppers的play方法的println也改成print了。

在XML配置文件中显式注册bean

混用Java和XML配置文件显式注册bean

《Spring in Action》第四版第一章《将Spring付诸实践》读书笔记(二)

Spring in Action(Spring实战)的这一章是对Spring进行概述,讲述了Spring的项目宗旨,基本原理和关键策略。并且对Spring框架进行了概览,比较Spring4与之前版本的区别。 这一章的读书笔记分为两篇,上一篇是对Spring的项目宗旨,基本原理和关键策略的读书笔记,这一篇对Spring框架进行概览,并比较Spring4与之前版本的区别。 Spring不仅通过依...

Continue Reading →

《Spring in Action》第四版第一章《将Spring付诸实践》读书笔记(一)

Spring的宗旨和关键策略

Spring in Action(Spring实战)的这一章是对Spring进行概述,讲述了Spring的项目宗旨,基本原理和关键策略。并且对Spring框架进行了概览,比较Spring4与之前版本的区别。这一章的读书笔记分为两篇,这一篇是对Spring的项目宗旨,基本原理和关键策略的读书笔记,下一篇对Spring框架进行概览,并比较Spring4与之前版本的区别。

Spring项目的宗旨是简化Java开发,主要使用以下四个关键策略:

  • 使用POJO进行轻量化和最小侵入的开发
  • 利用依赖注入和面向接口编程,实现松耦合
  • 通过面向方面编程以及约定来实现声明式编程
  • 通过面向方面编程和模板(template)来消除样板化的重复代码(boilerplate code)

笔者按照POJO、依赖注入、面向方面编程和使用模板四个方面整理了以下笔记。

释放POJO的能量

POJO,全称是plain old Java object,根据维基百科,这个概念是在2000年提出的,用来给简单的对象命名。什么是简单呢,就是不使用任何对象模型(Java object models)、约定(conventions)和框架。理想情况下,一个POJO不能被任何定义限制,它不能被规定要继承特定类,比如:

1
public class Foo extends javax.servlet.http.HttpServlet { ...

不能被规定要实现特定接口,比如:

1
public class Bar implements javax.ejb.EntityBean { ...

不能被规定要加上特定标注,比如:

1
@javax.persistence.Entity public class Baz { ...

而下面这样简单的类才是一个POJO:

1
2
3
4
5
public class HelloWorldBean {
public String sayHello() {
return "Hello World";
}
}

然而,由于技术限制,有时候必须使用标注实现某些功能,这时,只要在加标注之前是一个POJO,去掉标注之后仍然是一个POJO,那么这个对象也可以当作是一个POJO。

一个Spring组件(component)可以是任何类型的POJO,Spring尽可能避免其API污染你的程序代码,Spring既不强迫你的代码实现一个Spring定义的接口,也不强迫你的代码继承Spring定义的类。实际上,从你的代码本身看不出是在使用Spring框架。最坏的情况下,就是要在你的代码里一个Spring的标注(anotation),但你的代码仍然是一个POJO。

POJO形式简单,但Spring通过依赖注入将各个POJO组装起来,释放出强大的功能。

依赖注入

Spring做了很多事,但是Spring最重要的是以下两个特性:

  • 依赖注入(dependency injection),简称DI
  • 面向方面编程(aspect-oriented programming),简称AOP
    这两个特性有着共同的编程思想,就是每个模块或类都专注于自己做的事,尽量做到松耦合,高内聚,尽可能可重用。依赖注入是在实例管理上做到这一点,而面向方面编程是在业务逻辑上做到这一点。

依赖注入这个词,听起来吓人,让人想到复杂的编程技术和设计模式。但其实并不复杂,使用依赖注入后,代码会明显变得简单、易读、容易测试。

依赖注入在处理类与类之间的引用上发挥作用。什么是依赖?类A要使用类B,我们就说类A依赖类B,从编程语言的角度,其实就是引用类B的实例。注入的意思就是,在类A外生成类B的实例,类A直接引用该实例,把主被动态一改,就是将类B的实例注入到类A中。如果不使用依赖注入,类A需要自己维护对B的直接引用(必须是具体的类型而不能是抽象类或接口),也就是要自己初始化一个B的实例。这导致了高度耦合,难以测试。

下面是一个没有使用依赖注入的例子:

1
2
3
4
5
6
7
8
9
10
11
12
13
14
15
16
// 专门拯救少女的骑士
public class DamselRescuingKnight implements Knight {

private RescueDamselQuest quest; // 拯救少女的远征,quest是远征的意思

// 与RescueDamselQuest高度耦合
public DamselRescuingKnight() {
this.quest = new RescueDamselQuest();
}

// 执行远征任务
public void embarkOnQuest() {
quest.embark();
}
}

这个例子中,RescueDamselQuest是DamselRescuingKnight自己创建的实例。这里有两点需要注意,第一点,RescueDamselQuest是DamselRescuingKnight自己创建的,而不是其它类传过来的,这样限制了quest的灵活性。第二点,RescueDamselQuest是一个具体类型(而不是抽象类或接口),将”远征“的目的限制在”拯救少女”,与RescueDamselQuest高度(过度)耦合了。因为骑士远征,可能是为了其它目的,比如屠龙、参加圆桌会议等,而由于过度耦合,embarkOnQuest没有办法执行这些任务了。

耦合是把双刃剑,过度耦合导致难以测试,难以复用,难以理解,修改bug容易引起其它bug。另一方面,没有耦合,类对要使用的类一无所知,就无法使用,几乎什么都做不了。所以,耦合是必要的,但要仔细管理。
而使用依赖注入可以很好解决这个问题。第三方工具统一生成和管理实例,以及实例之间的依赖关系。对象本身不需要创建或者获取它们使用的实例。

下面的BraveKnight与DamselRescuingKnight相比,就更加通用。

1
2
3
4
5
6
7
8
9
10
public class BraveKnight implements Knight {
private Quest quest;
public BraveKnight(Quest quest) {
this.quest = quest;
}
public void embarkOnQuest() {
quest.embark();
}
}

与DamselRescuingKnight相比,BraveKnight有两个改进的地方。第一,Quest作为参数从其它类传进来,而不是BraveKnight自己创建。第二,quest(出征)的类型为接口,而不是具体的RescueDamselQuest,这样出征的任务就没有被限制。

使用依赖注入进行单元测试

1
2
3
4
5
6
7
8
9
10
11
12
package com.springinaction.knights;
import static org.mockito.Mockito.*;
import org.junit.Test;
public class BraveKnightTest {
@Test
public void knightShouldEmbarkOnQuest() {
Quest mockQuest = mock(Quest.class);
BraveKnight knight = new BraveKnight(mockQuest);
knight.embarkOnQuest();
verify(mockQuest, times(1)).embark();
}
}

借助于mockito和junit,可以很方便地进行单元测试。首先,利用mockito的mock方法,模拟一个Quest对象。再将这个对象的引用注入到BraveKnight对象中。执行embarkOnQuest方法后,验证是否正好执行一次。从这段代码可以看出,对于BraveKnight而言,Quest是从外部生成,再注入到BraveKnight的。

装配

将应用组件关联起来的动作叫做装配(wiring)。可以使用XML的方式进行配置,也可以使用Java代码。(个人觉得Java的方式更加可读和可维护,这里只记录java方式。)

1
2
3
4
5
6
7
8
9
10
11
@Configuration
public class KnightConfig {
@Bean
public Knight knight() {
return new BraveKnight(quest());
}
@Bean
public Quest quest() {
return new SlayDragonQuest(System.out);
}
}

这个配置文件为Knight和Quest接口创建了实例,并且将Quest的实例注入到Knight中。也可以说是把Quest装配到Knight中(Quest还可以继续装配到其它bean里)。但是它们是如何加载,又加载到哪里呢?答案是,应用程序的bean是在Spring容器中。将这两个bean注册到应用上下文后,通过应用上下文可以获取到这些bean。

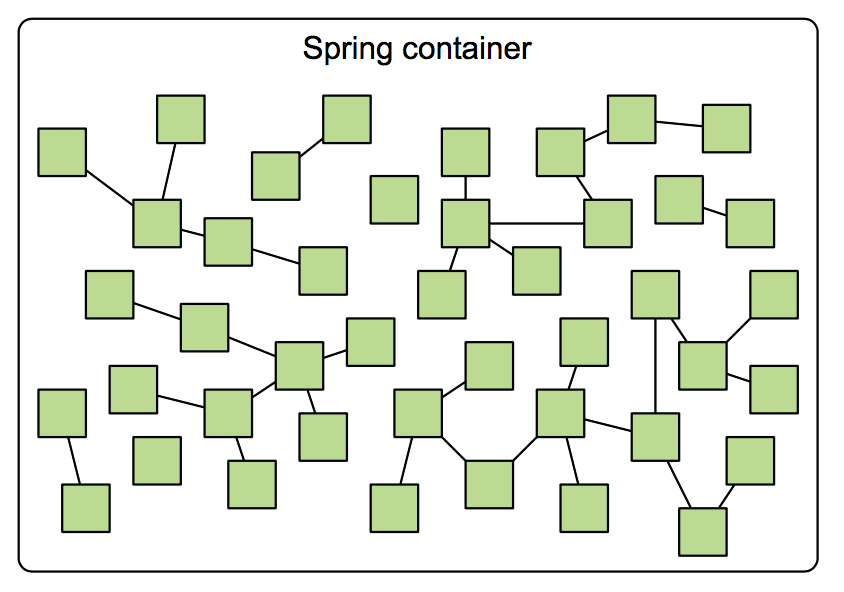
Spring容器

在使用Spring的应用中,所有的对象都存活于Spring容器中。容器创建对象,配置它们,将它们装配在一起,并管理它们从new到finalize的完整生命周期。

Spring容器
Spring容器是Spring框架的核心,Spring容器使用框架来管理应用程序的组件,包括创建组件直接的关联。不存在单一的Spring容器,Spring容器是由可分为两类的一些容器构成。bean工厂(Bean factories,由org.springframework.beans.factory.BeanFactory接口定义)是最简单的容器,为依赖注入提供基础的支持。应用上下文(Application contexts,由org.springframework.context.ApplicationContext接口定义),是一个提供了应用框架层级服务的bean工厂。这些服务包括:从属性文件解析文本,将应用的事件发布到相应的事件监听器等。对于大部分应用来说,bean工厂的级别太低,能做的事太少,所以偏好使用应用上下文。

使用应用上下文

Spring偏好使用应用上下文,以下是主要的上下文:

  • AnnotationConfigApplicationContext,从一个或多个Java配置文件中加载Spring应用上下文。
  • AnnotationConfigWebApplicationContext,从一个或多个Java配置文件中加载Spring web应用上下文。
  • ClassPathXmlApplicationContext,从classpath目录下的一个或多个xml配置文件中加载上下文定义,并且将上下文定义看作classpath的资源。
  • FileSystemXmlApplicationContext,从文件系统下的一个或多个xml配置文件中加载上下文定义。
  • XmlWebApplicationContext,从web应用程序中的一个或多个xml配置文件中加载上下文定义。

AnnotationConfigWebApplicationContext和ApplicationContext涉及Spring web的内容将在第八章展开,先看FileSystemXmlApplicationContext和ClassPathXmlApplicationContext这两个使用xml加载上下文的例子。这两种方式和从bean工厂加载bean相似。

1
2
//使用FileSystemXmlApplicationContext加载applicationContext
ApplicationContext context = new FileSystemXmlApplicationContext("c:/knight.xml");
1
2
//使用ClassPathXmlApplicationContext加载applicationContext
ApplicationContext context = new ClassPathXmlApplicationContext("knight.xml");

两种方式的区别在于,FileSystemXmlApplicationContext在文件系统里的特定位置查找xml配置文件,而ClassPathXmlApplicationContext在classpathl里(包括jar里)的任何地方查找xml配置文件。

还可以使用java配置的方式,用AnnotationConfigApplicationContext加载上下文。

1
2
//使用AnnotationConfigApplicationContext加载applicationContext
ApplicationContext context = new AnnotationConfigApplicationContext(com.springinaction.knights.config.KnightConfig.class);

获取到context之后,可以使用context的getBean()方法获取bean。

1
2
3
4
5
6
7
8
9
10
public class KnightMain {
public static void main(String[] args) throws Exception {
ClassPathXmlApplicationContext context =
 new ClassPathXmlApplicationContext(
"META-INF/spring/knight.xml");
Knight knight = context.getBean(Knight.class);
knight.embarkOnQuest();
context.close();
}
}

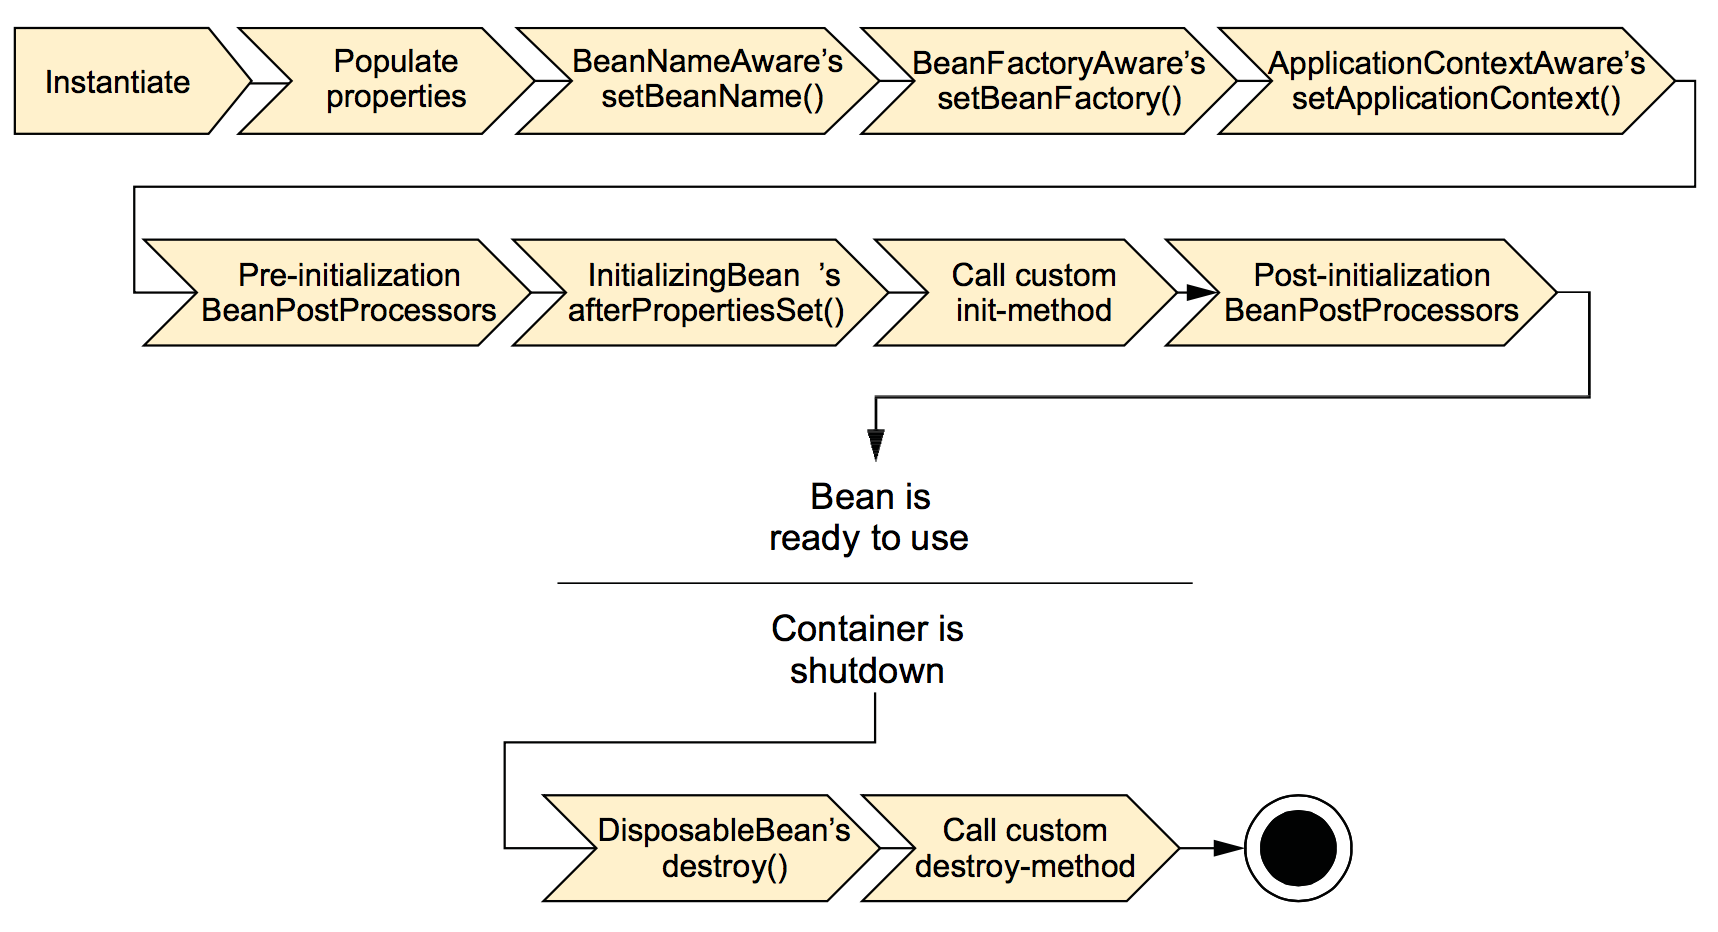
bean的生命周期

在传统的java应用中,bean的生命周期很简单,用new初始化,不用的时候,垃圾回收机制会自动回收。
Spring的bean的生命周期
生命周期里的每一步,都可以根据需要进行定制。下面分别解释这些步骤。

  1. Spring初始化bean。
  2. Spring将值和bean的引用注入到bean的属性里。
  3. 如果bean实现了BeanNameAware接口,Spring把bean的ID传给setBeanName()方法。
  4. 如果bean实现了BeanFactoryAware接口,Spring会调用setBeanFactory方法,将bean factory传入。
  5. 如果bean实现了ApplicationContextAware接口,Spring会调用setApplicationContext()方法,将bean的引用传给封闭的应用上下文(application context)。
  6. 如果bean实现了BeanPostProcessor接口,Spring会调用这个接口的postProcessBeforeInitialization()方法。
  7. 如果bean实现了InitializingBean接口,Spring会调用这个接口的afterPropertiesSet()方法。类似地,如果这个bean使用了初始化方法进行声明,特定的初始化方法也会被调用。
  8. 如果bean实现了BeanPostProcessor接口,Spring会调用这个接口的postProcessAfterInitialization()方法。
  9. 此时,bean已经在应用上下文(application context)中,可以被应用使用了。当应用上下文销毁时,bean才会被销毁。
  10. 如果bean实现了DisposableBean接口,Spring会调用这个接口的destroy方法,同时,如果bean使用了销毁方法进行声明,特定的销毁方法会被调用。

(笔者再说说平时编程时感受到的,依赖注入的一些好处。由于Spring容器将所有的实例统一管理,类A在使用类B时,只需要声明对类B的引用,就可以直接从Spring容器里获取B的实例,不用再重新生成一个B的实例。假定实例范围定义为全局唯一,如果A2也使用类B,也只需要声明对类B的引用,获取同一个实例,依赖注入可以减少重复实例化,避免重复生成实例的开销。依赖注入更大的好处体现在引用具有传递性时,比如类A使用类B,而类B又使用类C。因为从功能上看,类其实是方法的集合,类A可能只使用类B的一个方法,而这个方法并未使用类C。那么实际上在业务和功能上,类A只需要和类B耦合,根本不使用类C。如果没有使用依赖注入,如果类A要使用类B,需要显式地实例化B,而要实例化B,又要先实例化C,特别是在C的构造函数带有参数时,过程令人抓狂。由于各个类之间的引用情况可能非常复杂,引用链可能很长,这个过程会非常痛苦。)

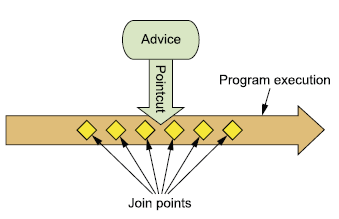
面向方面编程(AOP)

依赖注入实现了组件的松耦合,而面向方面编程可以使用全系统范围的可重用的组件的功能。

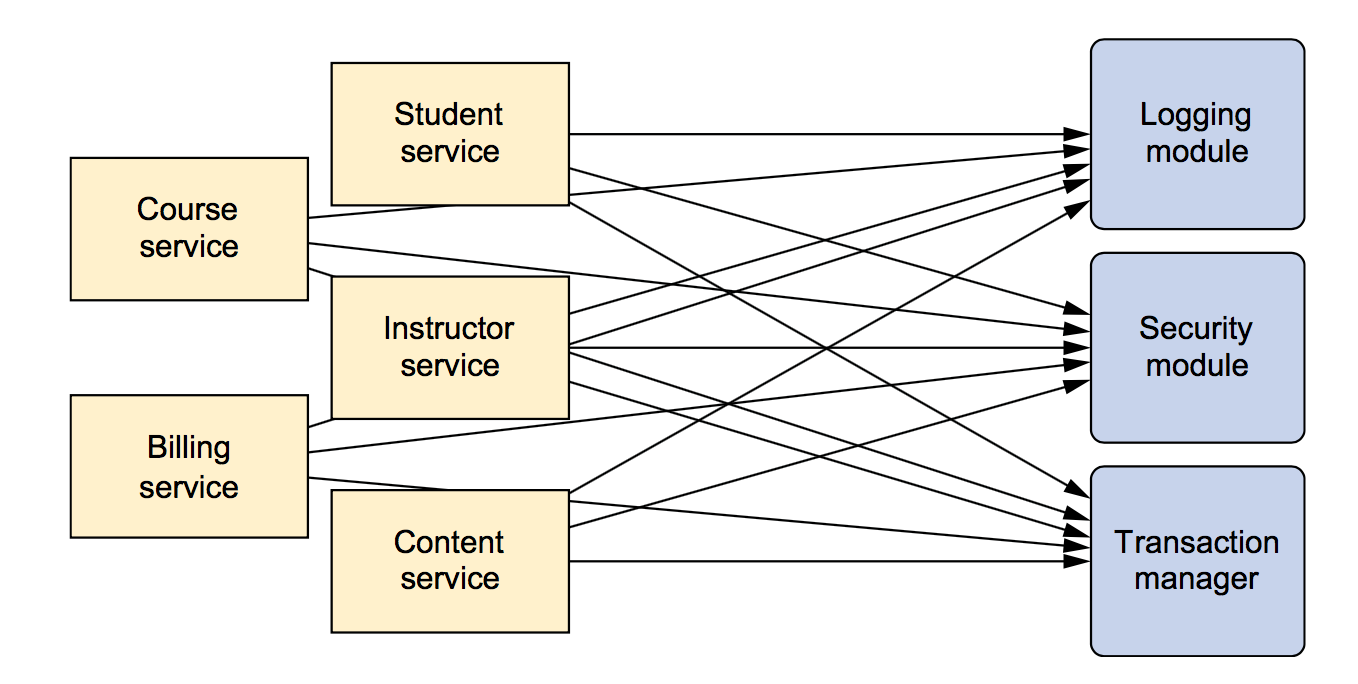
面向方面编程将系统的关注点分离。系统由组件构成,各个组件负责自己的功能。但是有时候,组件也要处理一些非核心功能。像日志、事务管理和安全性这样的功能在各个组件中经常出现,而这些组件的核心功能并不是这些功能。

在多个组件里都关注这些非核心功能(的实现),既使得这些功能的代码重复,又使组件的代码被这些代码污染,显得杂乱。

不使用aop

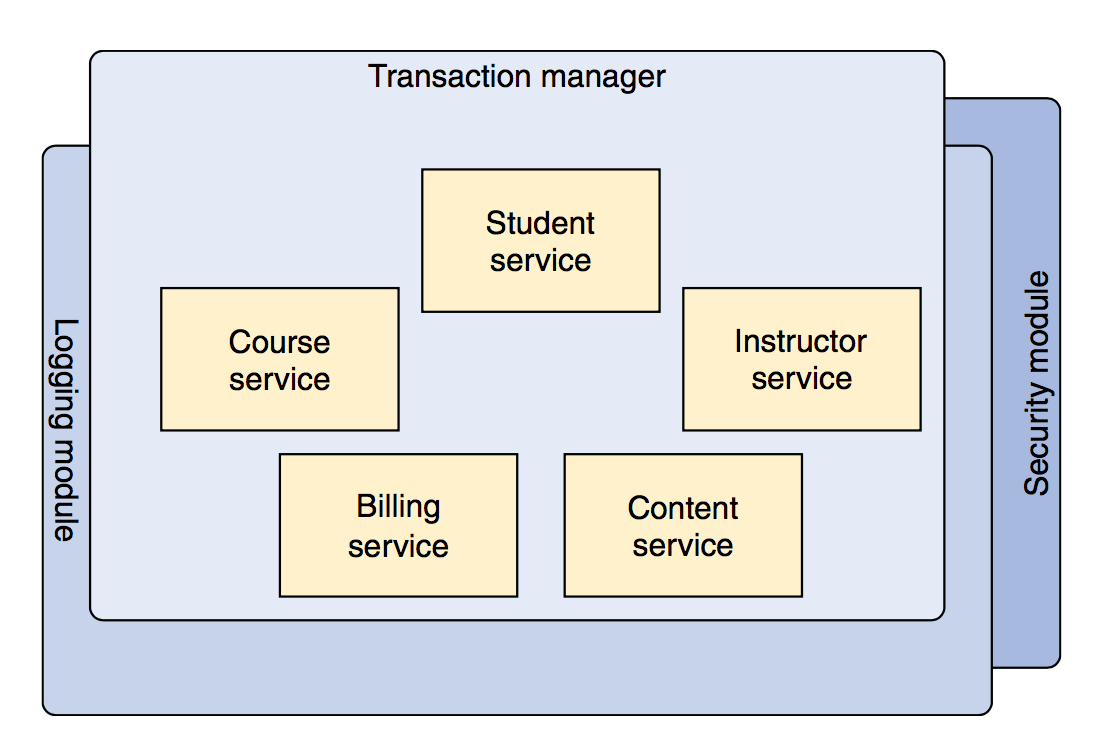
而面向方面编程可以让组件只关心核心功能,实现高内聚,并且确保POJO保持朴素(plain)。

使用aop

日志、事务和安全等各个方面(aspect)就像一张张毯子,覆盖在各个组件上,毯子只关心自己的业务,不侵入到组件内部,组件也不用关心毯子的存在。

下面的例子是没有使用AOP时,骑士要自己负责在行动前和行动后,提醒歌手唱歌。

1
2
3
4
5
6
7
8
9
10
11
12
13
public class BraveKnight implements Knight {
private Quest quest;
private Minstrel minstrel;
public BraveKnight(Quest quest, Minstrel minstrel) {
 this.quest = quest;
this.minstrel = minstrel;
}
public void embarkOnQuest() throws QuestException {
minstrel.singBeforeQuest();
quest.embark();
minstrel.singAfterQuest();
}
}

这样会有一些问题,从业务角度,歌手应该要自己观察骑士的行为,自动唱歌,而不应该是骑士提醒。而且骑士根本不需要知道歌手的存在。从代码角度来说,骑士只管行动就好了,处理唱歌不仅让代码显得杂乱,还要注入minstrel对象,这也导致要检查这个对象是否为null。所以需要将Minstrel配置成方面(aspect),并且进行其它配置,让Minstrel观察骑士的行为,并在适当的时间做适当的事。

1
2
3
4
5
6
7
8
9
10
11
12
13
14
15
16
17
18
19
20
21
22
23
24
25
26
27
<?xml version="1.0" encoding="UTF-8"?>>
<beans xmlns="http://www.springframework.org/schema/beans"
xmlns:xsi="http://www.w3.org/2001/XMLSchema-instance"
xmlns:aop="http://www.springframework.org/schema/aop"
xsi:schemaLocation="http://www.springframework.org/schema/aop
http://www.springframework.org/schema/aop/spring-aop-3.2.xsd
http://www.springframework.org/schema/beans
http://www.springframework.org/schema/beans/spring-beans.xsd">
<bean id="knight" class="com.springinaction.knights.BraveKnight">
<constructor-arg ref="quest" />
</bean>
<bean id="quest" class="com.springinaction.knights.SlayDragonQuest"> <constructor-arg value="#{T(System).out}" />
</bean>
<bean id="minstrel" class="com.springinaction.knights.Minstrel">
<constructor-arg value="#{T(System).out}" />
</bean>
<aop:config>
<aop:aspect ref="minstrel">
<aop:pointcut id="embark"
expression="execution(* *.embarkOnQuest(..))"/>
 <aop:before pointcut-ref="embark"
method="singBeforeQuest"/>
<aop:after pointcut-ref="embark"
method="singAfterQuest"/>
</aop:aspect>
</aop:config>
</beans>

bean标签定义了各个实例,aop:config标签定义了aop的配置,详细内容会在第四章讲解。

使用模板减少冗余代码

有时候为了相似的功能,一遍又一遍地写相同的代码,这些代码就是样板化的重复代码(boilerplate code)。Java的API中就有很多这样的代码,比如JDBC。

1
2
3
4
5
6
7
8
9
10
11
12
13
14
15
16
17
18
19
20
21
22
23
24
25
26
27
28
29
30
31
32
33
34
35
36
37
38
39
40
public Employee getEmployeeById(long id) {
Connection conn = null;
PreparedStatement stmt = null;
ResultSet rs = null;
try {
conn = dataSource.getConnection();
stmt = conn.prepareStatement(
"select id, firstname, lastname, salary from " +
"employee where id=?");
stmt.setLong(1, id);
rs = stmt.executeQuery();
Employee employee = null;
if (rs.next()) {
employee = new Employee();
employee.setId(rs.getLong("id"));
employee.setFirstName(rs.getString("firstname"));
employee.setLastName(rs.getString("lastname"));
employee.setSalary(rs.getBigDecimal("salary"));
}
return employee;
} catch (SQLException e) {
} finally {
if(rs != null) {
try {
rs.close();
} catch(SQLException e) {}
}
if(stmt != null) {
try {
stmt.close();
} catch(SQLException e) {}
}
if(conn != null) {
try {
conn.close();
} catch(SQLException e) {}
}
}
return null;
}

查询的代码被埋没在JDBC规定的一堆代码里。首先,创建连接,然后创建statement,再查询以获得,还要处理这些过程产生的异常。在这些都做完了之后,还要进行清理,包括关闭结果集,关闭statement,关闭连接,当然,也还要处理这个过程产生的异常。大部分代码都和查询无关,而是来自JDBC的样板化的重复代码(boilerplate code)。不仅是JDBC,JMS、JNDI以及REST服务的使用方的代码,也经常会有重复代码。Spring通过将这些代码包装到template里,来减少样板化的代码。在JDBC方面,Spring使用JdbcTemplate做到这一点。下面是Spring使用SimpleJdbcTemplate的例子。

1
2
3
4
5
6
7
8
9
10
11
12
13
14
15
16
17
public Employee getEmployeeById(long id) {
return jdbcTemplate.queryForObject(
"select id, firstname, lastname, salary " +
"from employee where id=?",
new RowMapper<Employee>() {
public Employee mapRow(ResultSet rs,
int rowNum) throws SQLException {
Employee employee = new Employee();
employee.setId(rs.getLong("id"));
employee.setFirstName(rs.getString("firstname"));
employee.setLastName(rs.getString("lastname"));
employee.setSalary(rs.getBigDecimal("salary"));
return employee;
}
},
id);
}

这段代码将JDBC的那堆样板化的重复代码都交给jdbcTemplate处理,只关注查询任务本身,代码精简,也更加专注。

以上讲解了Spring利用面向POJO开发、依赖注入、面向方面编程和模板,来减少Java开发中代码的复杂性。同时,也展示了如何配置bean以及如何使用XML配置一个方面(aspect)。特别是对依赖注入和面向方面编程有了初步的了解。但是很多内容还是留有疑问,比如装配(wiring)方面的细节,将在第二章和第三章详述,而面向方面编程将在第四章展开。

© 2022 谈谈IT All Rights Reserved. 本站访客数人次 本站总访问量
Theme by hiero